Light Pink Nail Pearls — Beginner’s How-To Guide
A beginner-friendly guide to what light pink nail pearls are and how to apply them step-by-step for elegant, pearl-accented manicures.
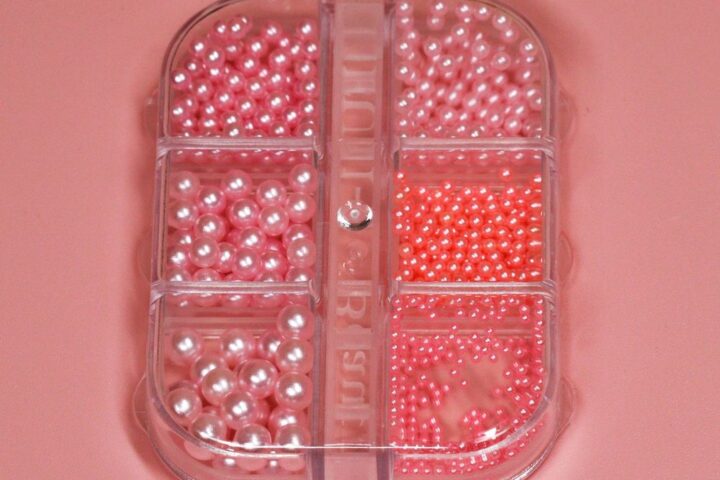
Small, luminous pearls can transform a basic polish into a delicate, eye-catching manicure. Light pink nail pearls are an easy way to add texture and shine without complicated tools or advanced skills. This guide explains what these beads are, what you get in a pack, and a clear step-by-step method for applying them at home or in a salon.
Before you begin, decide whether you want a scatter of pearls, a single accent, or a full pearl grid. To order a set for practice or a client, look for a set of light pink pearl beads like these at light pink pearl beads.
What are light pink nail pearls?
In nail art terms, “pearls” are small round embellishments with a soft, iridescent finish. These light pink nail pearls are sold as nail rhinestones or beads intended for decorating fingernails. They fall into the family of flatback rhinestones and round beads, meaning they sit flat against the nail surface for secure adhesion and a neat profile.
What’s included in the pack
Each pack contains multiple grids of pearls arranged for easy storage and selection. The product is supplied in six grids per pack, giving you repeated sets for multiple manicures or for practice. Pricing for this product is listed at $6.00 for the pack, though prices may change.
Tools and basics you’ll need
- Clean nails, trimmed and shaped.
- Base coat and colored polish of your choice.
- Adhesive: nail glue or a tacky gel layer from a builder gel or topcoat.
- A tweezer or wax pencil/stone picker for placement.
- Sealing topcoat: apply a gel or regular topcoat to secure and smooth edges.
Step-by-step application for beginners
- Prep the natural nail. Remove old polish, push back cuticles, and lightly buff the surface for better adhesion.
- Apply base coat and color. Paint a thin base coat, then your chosen color. Let each layer dry to the touch—if using gel polish, cure according to the product directions.
- Choose your adhesive method. For a quick hold, small drops of nail glue work well; for a smoother finish and stronger hold under a lamp, use a tacky gel or builder gel layer.
- Place the pearls. Use a tweezer or wax picker to lift a pearl from the grid and gently set it onto the adhesive. Hold for a few seconds so the bead seats fully against the nail surface. For designs, plan placement before you start applying.
- Seal the design. Apply a generous amount of topcoat around the base of each pearl to lock edges. If using a gel topcoat, cure as directed. For heavily raised designs, apply topcoat in thin layers so the finish remains smooth.
- Final inspection. Check each pearl for stability, remove any excess adhesive, and clean the skin around the nail if needed.
Placement ideas and composition tips
Even simple compositions can look professional with a few layout rules: place the largest cluster at the base or side of the nail for a focal point; use single pearls on ring fingers as subtle accents; scatter small pearls across a nail for a confetti effect. Mixing pearl sizes and pairing with flatback rhinestones or metal bead accents creates contrast—stick to a palette that complements the light pink tone.
Who should use these pearls?
- Beginners who want a low-barrier way to experiment with 3D nail art.
- Salon techs seeking an affordable bulk option for client decorations.
- DIY mani enthusiasts crafting bridal or soft-glam looks.
Care, durability and safety notes
Pearl embellishments are decorative and will wear with normal hand use. Sealing pearls well and avoiding heavy scraping or picking extends longevity. When removing, soak off any gel or loosen glue with an appropriate remover rather than prying pearls off, to protect the natural nail. If you experience irritation after applying any nail decoration, remove the products and consult a professional.
Storage tips
Keep unused grids in a dry, cool place to retain shine and prevent discoloration. Handle pearls by the edges when possible to avoid fingerprints or loss of luster.
Key features in context
- Six grids per pack: multiple sets for practice or repeated applications without reordering immediately.
- Flatback, round beads: secure and easy to place for stable designs.
- Light pink finish: soft, versatile color that pairs well with neutrals and pastels.
Available from Dynamic Nail Supply, these pearls are presented as an accessible decorative option whether you’re building your skills or adding final touches to client work.
Quick troubleshooting for beginners
- If a pearl lifts: press it back down and add a small amount of adhesive under the edge, then reseal.
- If topcoat fogs: allow more dry time between layers or use a thinner application to avoid trapping air.
- If placement slips: use a tiny amount of tacky gel as a temporary hold before final sealing.
With a little practice, light pink nail pearls can become a staple in your nail-art toolbox—simple to apply, striking in effect, and perfectly suited to romantic, bridal, or everyday chic looks.
Conclusion: Start small, plan your layout, and practice on a single nail before committing to a full set; the right adhesive and a steady hand are all you need to turn these tiny beads into memorable manicures.